


A Drawing for Beginners: The Griffin
The Griffin, a majestic hybrid creature, captures the imagination with its unique blend of an eagle's upper body and a lion's lower half. Drawing such fantastical beings can be both exciting and challenging, especially for beginners. In this demonstration, I'll guide you through the process of creating a striking illustration of a Battle Griffin, my particular brand of big cat-bird thing, complete with breast plate... fancy!
At each stage of the drawing, I will help you unravel techniques and simplify complex elements. The step-by-step process in this demonstration will make the drawing accessible for those at the beginning of their artistic endeavours and as we progress, we'll explore the finer details to bring our Battle Griffin to life.
Throughout, I'll encourage you to infuse your creativity into the process, experimenting with poses and expressions to develop your unique artistic style.

Tracing
Level I Preparation
When working with animals, it's advisable to focus on the underlying anatomy of bones and muscles rather than becoming overly preoccupied with intricate details like outlines and textures. To facilitate this approach, using photo tracings serves as a valuable warm-up exercise and an effective study technique.
The insights gathered through these tracing exercises can be seamlessly integrated into your more intricate drawings. Photographs offer an opportunity to thoroughly examine the animal, deconstructing its form visually to comprehend the dynamics of its muscle groups. Engaging in around eight such tracing studies prior to embarking on more comprehensive animal artwork can significantly enhance the precision and accuracy of your line work.

Cheating? - It's curious how students are frequently guided away from employing this straightforward and efficient approach to grasp the contours of a subject or creature before delving into their own artistic interpretations.

Given that the creature's legs and abdomen resemble those of a lion, I followed a similar method as I did with the eagle by tracing lion images. This process allows me to capture the most prominent shapes that constitute their anatomy. Additionally, tracing helps refine my hand's ability to accurately depict the lines and contours of this particular animal.


Sidequest - If you have a cat, I recommend stalking them with a pencil and sketchbook. Try to record the various poses and sense of gesture that the feline companion exhibits. Use stealth though because cats are very much like the griffin... proud, private and sometimes ruddy bloody vicious... like my cat.

Merlin
Kittyus Maximus
Has a +10 perception bonus in knowing if you're a Vet or not. He also has +10 chance of getting banned from Vetinary practices because he can be a little sod.

Naturally, working on a digital sketch opens up the door to more fluid experimentation with scale and positioning. It also provides a convenient way to assess which option yields a more appealing silhouette, particularly when factoring in the wing pose.
Sketching
Level II Preparation
It's crucial not to hold onto your work too tightly. Be prepared to let go of elements you might be attached to. In fact, be willing to make significant changes or even start anew if necessary. This advice is particularly pertinent if you're working digitally.
When it comes to digital sketches, they require more attention, revision, and experimentation compared to other mediums. This is mainly because the nature of the tablet surface can restrict the fluidity of your drawing arm's movements. Consequently, it's easier to unintentionally add excessive details or intricacies much faster than you would when working with a traditional pencil and paper.
Gesture plays a pivotal role in the development of images containing characters.
Dynamic gestures have a captivating effect, drawing the viewer's gaze and sparking visual interest. They hold the power to immerse the viewer into the scene, evoking curiosity about the characters' intentions and emotions.
Sometimes, the most critical information within a scene is communicated through subtle gestures. These subtle movements carry nuances that pique curiosity and encourage viewers to delve deeper into the characters' actions, offering room for interpretation.


Lighting
Level III Preparation
Experimenting with various lighting directions takes just a matter of seconds. After all, determining whether an upward or downward lighting arrangement suits this creature is a task best settled through trial and error.
Even if your imaginative skills are top-notch, there's wisdom in putting your ideas onto paper and testing them out. This ensures that you explore and validate your concepts thoroughly.
While top lighting brings drama, it can sometimes come across as predictable. Introducing light from the upper left injects dynamism by combining elements from side and top lighting, though to a lesser extent.
For a more sophisticated touch, you might delve into lighting techniques like the baroque style, adding layers of artistry to your composition.
Then there's rim lighting, a technique that injects drama and enigma. This effect is achieved by situating the light source behind the character, casting most of its forms into shadow. This configuration propels the silhouette to the forefront of the composition's hierarchy due to its stark contrast against the abundant shadowy areas.
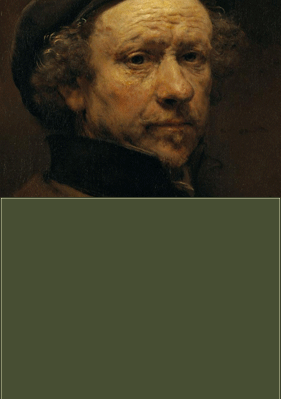
Rembrandt Lighting
Rembrandt lighting is characterized by a distinct triangular highlight on one side of the subject's face, created by positioning the main light source at a 45-degree angle to the subject and about 30-45 degrees above their eye level. This lighting setup results in a triangle of light on the shadowed side of the face, usually formed by the nose and cheek. The rest of the face is covered in shadow, creating a dramatic and three-dimensional effect.

Rim Lighting
Rim lighting is particularly effective when used against a darker or contrasting background, as the light source creates a visible rim or halo around the subject, making it stand out.
To achieve rim lighting, the light source is positioned behind the subject and directed toward the camera. This can be done using various light sources, such as studio lights, natural sunlight, or practical lights on a film set.